Of hex editors, cursed items and negative effects
There are quite some hidden bugs in Ambermoon which never would have been noticed if it wasn't for the Ambermoon Advanced project.
The cursed items feature is very cool in my opinion, but as there is only one single item in the game which is cursed, it left me with the impression of wasted potential. This is why I always wanted to add more of those cursed items. And so I decided to add another one to the mod. There might be more cursed items in later episodes as well of course.
This blog article will be very technical. Having some basic knowledge about computers and how they work will definitely be helpful, but I'll try to explain the things that are needed for you to be able to follow. We will actually modify the original Ambermoon executable, add new code and fix two real bugs together.
If you want to code/manipulate along, prepare a hex editor of your choice, maybe a decimal to hex and binary to hex converter and if you want to go the full mile, also install Ghidra which I can strongly recommend for reverse engineering. This all is optional of course. If you only want to read, you might skip some parts.
As a general rule of thumb: if you don't understand something, first try to read a bit more. Maybe it becomes clearer then. I'll try to explain complex matter with examples.
Ghidra can be downloaded at https://ghidra-sre.org. To work with Amiga assemblies I strongly recommend the Amiga hunk plugin in addition which you can find at https://github.com/lab313ru/ghidra_amiga_ldr.
Setup Ghidra and install the plugin:
- Download and install Ghidra
- Pick the right plugin version from here https://github.com/lab313ru/ghidra_amiga_ldr/releases (download the zip file after expanding "Assets").
- Open up Ghidra
- Select "File -> Install Extensions ..." and click the green plus symbol ("Add extension")
- Navigate to the downloaded plugin zip file
- If you picked the right version, the extension should be added
- Then create a new non-shared project
- At last you can just drag&drop the Ambermoon executables (e.g. AM2_CPU) from your
filesystem into Ghidra
If we modify code in this blog article, always use the hex editor. Ghidra is only used for analyzing the assembler instructions or to find something inside the code or data.
The first issue
Cursed items in Ambermoon will reverse bonus effects and will instead cripple your stats by the negated amount. So instead of +10 strength you'll get -10 if the item is cursed and you equip it.
The effect is negated for:
- Bonus attribute
- Bonus skill
- Bonus HP
- Bonus SP
- Damage
- Defense
In the original Ambermoon there is only a single cursed item. I don't want to spoiler here which item it is. Anyway the item "grants" 15 Strength (bonus attribute), 25 Attack (bonus skill) and 50 bonus SP. But as it is cursed, you know, it is really -15 Strength, -25 Attack and -50 SP. The item does not change the damage or defense though! Which is the reason why the following issue was never noticed in the original.
The four bonus values which can be affected are only visible in the item details (eye button in the item window) which are only available after identifying the item. There you can also see a blinking text which tells you that the item is cursed. So basically only the act of identifying reveals the curse state to you. Of course you can just equip the item and notice its crippling effects as well. But then it is already too late as the curse will already take effect and you can't unequip the item anymore. To see the cursed state directly on the item and even before you equip it, you have to identify it.
Now the problem is that the damage and defense values of an item are already shown in the normal item window which you can see without identifying it. This is the case because damage and defense of an item are not considered as hidden bonus stats like the other values.
So when you would have a cursed dagger and it has 10 damage, the game will show you the negative amount of -10 right from the start. This way you could immediately tell that this item is cursed. This is not obvious in the original as there is only this one item and it has 0 damage and 0 defense as mentioned. And a negated 0 is still a 0. :)
From my perspective it would be much better to display the normal +10 until you have identified the item to be consistent with the other values. And then of course display -10. Otherwise you would know that the item is cursed without identifying it, which feels wrong.
This hasn't to be a real bug per se, but I consider this worth a change. It just didn't feel right in Ambermoon Advanced to observe the item and directly see a strange damage value. If you haven't seen that the item is cursed by identifying it, you even might think it is a bug as the item looks normal otherwise.
Long story short: I wanted to adjust the damage and defense display logic of cursed items as mentioned.
The second issue
To make things even worse, the game has another bug related to this. And this time it is definitely a real bug. :) The game displays the values for damage and defense as an unsigned byte. This means a value which can only have a value from 0 to +255. But how would you display -10 then? Sure it wasn't needed in the original as there was no cursed item with damage or defense and therefore no item with negative damage or defense at all. But it is technically possible to have cursed items with those values, so I consider this to be a bug.
Ok, let's have a look on how negative values are represented. If you know what a two-complement representation is, you might skip the following explanations and continue at the yellow text marker below.
I will only briefly explain what it means at this point. There are many resources out there as well.
Two-complement representation
Computer memory doesn't know anything about positive or negative numbers. There are only bits. One byte consists of 8 bits. Interpreting these bits as a number is up to the CPU or user. In our case signed numbers (numbers that can be positive or negative) are expressed as a so called two-complement value. Basically this means that the most significant bit contains the information if the number is positive (bit = 0) or negative (bit = 1). The decimal number 0 counts as a positive number (sign bit is not set) and is expressed by the bit sequence
00000000 (all eight bits are 0).
Bits in a two-complement byte:
+--------+
Index |76543210|
+--------+
|SXXXXXXX|
+--------+
Here the S stands for 'sign'. If the sign bit is not set, the remaining 7 bits give the number as is. So the bit sequence 00000001 will just represent the number 1 and 00001111 will represent the number 0x0F (<- this is a hex value) which is 15 in decimal. I hope you can convert bits to hex. ;)
But if the sign bit is set, you can't just read the other 7 bits as before and prepend a minus. So 10000001 is NOT -1! The number -1 is instead represented by the bit sequence 11111111, -2 is 11111110 and so on. This might look weird but is very useful when it comes to calculations. Note that smaller negative numbers are also represented by smaller bit representations (-2 is smaller than -1 and 11111110 is smaller than 11111111).
Let's assume you have the value -1 in memory and add 1 to it. You should know that the result of -1 + 1 is most likely 0. :) Now use our two-complement bit representations:
Value | Bits
----- | --------
-1 | 11111111
1 | 00000001
If you add them together, each bit is added from right to left. First the two 1s on the right. In bit addition 1+1=0 and a 1 is carried over to the next bit. In math you know this process with the base of 10.
For 25+17 you can first add the second digits (5+7) and get 12. Then you just put the 2 in the result and carry the 1 over to the next digit. Then you add 2+1 (first digits) and also add the carried 1 and get 4. So the result of 25+17 is 42. Of course it is. :)
Addition of normal numbers. Little math class recap. :)
25
+ 17
------
C 1 (values which are carried over to the next digit)
------
42 (sum of digits 5 and 7 is 12, put 2 here and carry the 1 over)
(the 4 is now 2 + 1 + 1 from carry)
Ok so back to the bit addition. After the bits on the right are added together, we get 11111110 and a 1 is carried over to the second bit. We add together the second bits and the carry so in this case we have 1+0 (which is 1) and add the carry (1) as well. So again we have 1+1 which is again 0 and 1 is again carried over to the next bit. As you can see this continues for all other bits. In the end we have all zeros. So -1 + 1 is indeed 0.
Overview of the bit additions:
11111111
+ 00000001
----------
1
+ 1
----------
10 (result of first bit addition including carry bit)
+ 1 (second bit from first value)
+ 0 (second bit from second value)
----------
100 (result of previous additions including carry bit)
+ 1 (third bit from first value)
+ 0 (third bit from second value)
----------
1000 (result of previous additions including carry bit)
+ 1 (fourth bit from first value)
+ 0 (fourth bit from second value)
----------
...
----------
100000000 (result of all previous bit additions including carry bit)
(a byte only has 8 bits and the carry bit is not stored in the data, it is
only used for calculations)
00000000 The effective result is therefore 0.
Now assume we would have expressed -1 as
10000001 instead.
10000001 added to
00000001 would just result in
10000010. And this would be -2 with the same representation logic. So it wouldn't work this way.
-1 + 1 would become -2 which is obviously wrong.
This is only a brief explanation. If you are interested in two-complement representation or memory, bits and bytes in general, there are many resources out there. ;)
(Continue here if you skipped the two-complement stuff)
But now let's get back to our issue: how would -10 be expressed? Well -10 as bits is
11110110. If this is not obvious by now, just start at -1 which is known as
11111111. Now to get from there to -10 just subtract 9 because -1 - 9 is -10. The value 9 in bits is just
00001001. So subtract those bits from the -1 bits. For most bits you will have 1 minus 0 which stays at 1 so those bits won't change. Only for two bits you have 1 minus 1 which is 0. So these bits become 0.
This time subtract the bits which is even easier as there won't be any carry bits in this case.
Value | Bits
----- | --------
-1 | 11111111
9 | 00001001
------|---------
-10 | 11110110
And so we have our bit representation for -10 as 11110110. There is also a neat little trick to invert a value if you know its positive bit sequence. You just have to invert all bits and add a 1. +10 in binary is 00001010. After inverting all bits you habe 11110101. Now we add 1. The last bit will become 0 and carries a 1 over to the next. There is a 0, so 0 + 1 (carry) is just 1 and we are done: 11110110.
The cursed dagger would store its damage exactly as this value in memory. Now the problem is that the game interprets this value as an unsigned byte (a byte which has no sign bit).
As I said before, the memory just stores bits so you can interpret those bits to your liking. The two-complement representation is only one way to interpret those bits. You can also just read them as a positive number without a sign bit.
So the game takes the bit sequence 11110110 and reads it as an unsigned byte which is just 246.
Conclusion:
The cursed dagger would show a damage of +246 instead of -10 in game.
Maybe one last word about converting a binary value (bits) to a decimal number. Each bit stands for some number. If the bit is 1, the number is added, otherwise it is not. As this is a binary number system (only two states -> 0 and 1), each bit represents a number which is of the form 2 to some power. The least significant bit stands for the number 1, the next bit for 2, the next bit for 4 and so on. Just look at the following image. The bit representation is given in yellow. The grey boxes show which number is represented by each bit.
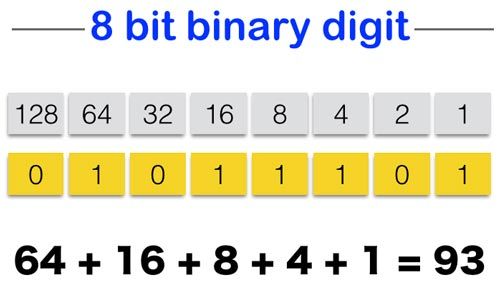
So we can see how 11110110 is actually 246. We have 1 x 128 + 1 x 64 + 1 x 32 + 1 x 16 + 0 x 8 + 1 x 4 + 1 x 2 + 0 x 1. And this is exactly 246. Quite easy isn't it? :) Of course if you have a word (16 bits) or long-word (32 bits) the more significant bits will then stand for the numbers 256, 512, 1024, 2048 and so on. You just have to double the value for each bit. The more bits you have, the more numbers you can represent.
Phew! I hope you are still there and not already fell asleep or ran away screaming (like my wife did). But for the stuff we're going to do, you will need a bit of background.
The fixes
The plan is to show the normal uncursed value if either the item is not identified yet or if it isn't cursed at all. Only if the item is cursed AND identified the item window will display the cursed damage and defense value.
We will also fix the display to show negative values as well.
Currently the game checks for the item's cursed flag and negates the damage or defense value if the flag is set. We will change that. Afterwards the game will check for the cursed AND identified flag and only then negates the value. Note that this only affects the display, the item will still cripple your stats immediately when you equip it, even if it is not identified of course. Sounds easy right? Well, as we don't have the source code but only the compiled m68k binary, it isn't as easy as it may seem. Let's have some fun! :)
The process
Before we start analyzing and modifying the main executables of Ambermoon we have to ensure that we work on a decrunched version of the files. To save some space, the executables are most likely crunched in some way. The original releases used the Imploder to do so. You can find the Imploder at a few places on the web. For example here: http://aminet.net/package/util/pack/imploder-4.0.
You will need a real Amiga or an emulator to use it. So if you want to test the following stuff, be sure to deplode the files before. The main executables of Ambermoon are "AM2_CPU" and "AM2_BLIT". They basically are equivalent regarding game logic. The only difference is how they render and on which systems they are used. To make changes that work on all Amiga systems you have to fix/modify both files. For testing purposes just stick to one of them for now. The choice is yours. I will use the "AM2_CPU" below.
I prepared the unfixed and fixed AM2_CPU files for you already here if you want: https://github.com/Pyrdacor/Ambermoon/tree/master/Blog/CurseFix. There might be some other changes as I simply used the most recent original versions as unfixed and the Ambermoon Advanced versions as fixed.
Ok let's start.
First I had to find the place where the damage is actually printed to the item window. Luckily Ambermoon uses some fixed strings like
"DAMAGE:" and you can search for that in a hex editor or tools like Ghidra. I used Ghidra as it can also backtrack the references and display the binary data as assembler instructions (at least most of the times). The german version of course uses the german text
"SCHADEN:" instead.
I hope you know what a string is. In our case, it is basically a sequence of bytes where each byte represents some character. The logic which byte value means which character is determined by a character set. Note that all strings end with a zero byte. The Amiga character set can be found here: https://second.wiki/wiki/commodore_amiga_zeichensatz
By finding the string and backtracking its usage in Ghidra, I found the code which actually negates the damage and defense values.
To find a string in Ghidra you can just select "Search -> Program Text..." and type in the text. Ensure that "All Fields" and "All Blocks" is checked and then hit "Search All". You should get one single result. Doubleclick it to jump to the address of it. What you see in front of you now, is a simple text definition. A static text that was placed somewhere in memory.
Normally if such a string or other data is referenced from code (used by code), you can see that in Ghidra and jump to that code (see image).

Unfortunately Ghidra isn't always able to read all the code correctly (maybe more recent versions of Ghidra will). So if you don't see any reference (like in the image above), we have to do more work to find the code. If you already see the reference, just jump to it and skip reading the next paragraphs. Continue at "Analyzing the code".
If you are unlucky like me you should only see something similar to this now:

What we know in any case is where the string is located in memory. It is the 8-digit hex value you see at the start of the line. In my case 00272180. If any code uses the string, it has to specifiy this address somehow. So open up "Search -> Memory..." now. We will search the whole memory of our file for this address.
Select "Hex" as we will search for a hex number. Also check "All Blocks". In the "Search Value" field just insert the address like 00272180. Hit "Search All" and you should find something. Doubleclick to jump there.
You should now see some random data that doesn't look like code:
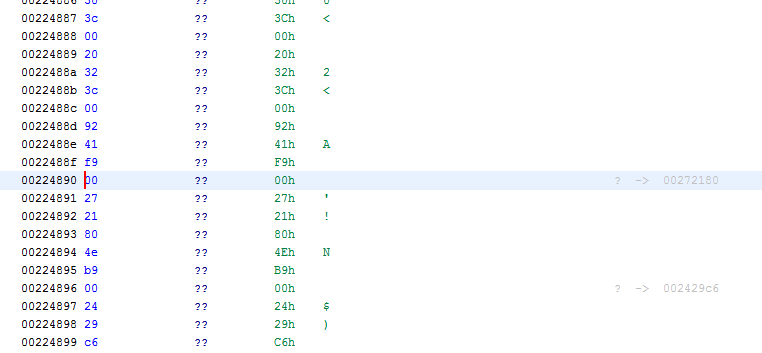
All these bytes might be code indeed, but Ghidra wasn't able to make sense out of it (hence the ??). To help Ghidra a bit, we have to scroll up until we reach some real code. It might take a while so best use the "Page Up" key on your keyboard. Don't use the scroll bar directly as you might scroll much too far. If you get lost, repeat the memory search. You should eventually reach the following spot.
Now select the first line with a ??, rightclick and choose "Disassemble". Ghidra will use some magic and the data is transformed to actual code.
This will also connect the references and all that stuff. Now it's time to navigate back to the code that uses the string. Either use the memory search again or just scroll back down until you get there.
Analyzing the code
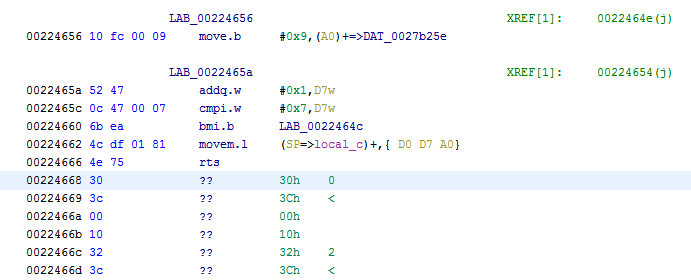
Basically the current code looks like this in Ghidra (german AM2_CPU). I highlighted the line where the string is referenced and where we should start.
0022486e 41 f9 00 lea (s__012_00272180+9).l,A0 = " 012"
27 21 89
00224874 10 2a 00 0e move.b (0xe,A2),D0b
00224878 4e b9 00 jsr FUN_00224ba0.l
22 4b a0
0022487e 7e 03 moveq #0x3,D7
00224880 4e b9 00 jsr FUN_002463b2.l
24 63 b2
00224886 30 3c 00 20 move.w #0x20,D0w
0022488a 32 3c 00 92 move.w #0x92,D1w
0022488e 41 f9 00 lea (s_SCHADEN:_012_00272180).l,A0 = "SCHADEN: 012"
27 21 80
00224894 4e b9 00 jsr FUN_002429c6.l
24 29 c6
0022489a 41 f9 00 lea (s__012_0027218e+9).l,A0 = " 012"
27 21 97
002248a0 10 2a 00 0d move.b (0xd,A2),D0b
002248a4 4e b9 00 jsr FUN_00224ba0.l
22 4b a0
002248aa 7e 03 moveq #0x3,D7
002248ac 4e b9 00 jsr FUN_002463b2.l
24 63 b2
002248b2 30 3c 00 20 move.w #0x20,D0w
002248b6 32 3c 00 9a move.w #0x9a,D1w
002248ba 41 f9 00 lea (s__SCHUTZ:_012_0027218e).l,A0 = " SCHUTZ: 012"
27 21 8e
002248c0 4e b9 00 jsr FUN_002429c6.l
24 29 c6
A quick note: it's going to get deeply technical at this point, so I'll give you some hints.
The first column shows the memory addresses in hexadecimal form. This is not the offset inside the AM2_CPU file, but a possible offset inside memory. As the memory could be everywhere on program execution, this could be different for each run of the program. But in Ghidra just a static start offset is used for the memory so you can always count on it for the same project.
After the address, there are some more hex values shown as 2-digit pairs. Those are the binary representations of the instructions and basically what is stored inside the AM2_CPU file. So you would see exactly those values in a hex editor.
After that the human readable 68k assembler instructions are shown. The instruction name in the 3rd column and parameters in the 4th column. Some hints might be shown at the end of the line as well. The parameters use the prefix 0x if a value is in hexadecimal form, otherwise it is a normal integer. A0 to A7 are the address registers which store addresses (they point to some data structure in memory). D0 to D7 are general purpose data registers. You can store numbers for calculations and other stuff there and they are much faster than values in memory as they are located inside the CPU hardware.
Ok now let's have a look at the code! We start where our string "DAMAGE:" (or "SCHADEN:") is used.
The line lea (s_SCHADEN:_012_00272180).l,A0 loads the mentioned string into A0 (address register 0) for further usage (e.g. printing). LEA stands for LOAD EFFECTIVE ADDRESS. So basically it loads the address of the value you specify as a parameter (in our case the string "SCHADEN:"). On the right we actually see that at this address there is the string "SCHADEN: 012". This is given by a hint (the one with the = ). As we know that the damage must be written just behind the text we can assume that it will be inserted instead of the "012" part somehow. We might be close to the damage value negation. Let's read some Amiga code.
Next line is
jsr FUN_002429c6.l. This is a jump to a sub-routine or in other words: a function call. As we just moved our string to A0 (this is basically filling a function parameter as the function can access it this way), we can expect that the function
FUN_002429c6 is responsible for drawing the text somehow.
The following line is
lea (s__012_0027218e+9).l,A0. Again something is moved to A0. This time the address to a string of the form "012" is moved. Note that Ambermoon uses these kind of strings as placeholders for numbers. If a number should be at max 3 digits in size, the given string "012" is used. A 1-digit placeholder would be just "0" and a 5-digit placeholder would be "01234".
In addition to the string with the placeholder we also need the damage value itself of course. This is most likely done in the next line:
move.b (0xd,A2),D0b. Here the byte at offset
0xd of the structure at A2 is moved somewhere. The "b" after the "move" gives the type of movement. "b" just stands for byte. So we just move a single byte. Note that this command does not care about signed or unsigned. It just moves 8 bits somewhere and won't interpret it. The syntax for
move interprets the first parameter as the source and the second parameter as the target. So the value (0xd,A2) is moved to
D0b.
(0xd,A2) is a shortcut for address that is stored in address register 2 plus the offset of
0xd. For example if someone had previously stored the address
0x00001000 inside A2, the expression would result in
0x00001000 + 0xd which is
0x0000100d. Often address registers store addresses to some kind of data structure. In our case A2 points to the begin of the item data.
Ok let's open the documentation for the item data. You'll find this here:
https://github.com/Pyrdacor/Ambermoon/blob/master/FileSpecs/Items.md
Now we have to look what's at offset 0xd. Hm the docs say "Protection/defense" here and not "Damage". Doesn't fit, does it? But at offset 0xe we find the damage. Did we miss something? Yes, we did. Scrolling the code a bit up, we find the line move.b (0xe,A2),D0b. This looks like the damage. So it seems like the damage value is processed before the string "DAMAGE: 012" is loaded into A0. So back to the start. We look at the first line of the above code now.
Sorry if this is confusing, but I only mimic how I first detected the spot where the damage value was processed. We will now look at the code line in green which is above the spot we first found.
0022486e 41 f9 00 lea (s__012_00272180+9).l,A0 = " 012"
27 21 89
00224874 10 2a 00 0e move.b (0xe,A2),D0b
00224878 4e b9 00 jsr FUN_00224ba0.l
22 4b a0
0022487e 7e 03 moveq #0x3,D7
00224880 4e b9 00 jsr FUN_002463b2.l
24 63 b2
00224886 30 3c 00 20 move.w #0x20,D0w
0022488a 32 3c 00 92 move.w #0x92,D1w
0022488e 41 f9 00 lea (s_SCHADEN:_012_00272180).l,A0 = "SCHADEN: 012"
27 21 80
00224894 4e b9 00 jsr FUN_002429c6.l
First the address to the placeholder " 012" is loaded into A0 (lea instruction again). Then the damage value is moved to D0 (data register 0). As the damage is only 1 byte in size, we only move a byte again. And then we have another function call (jsr) to FUN_00224ba0 (which means function at address 0x00224ba0).
Let's see what this function does:
FUN_00224ba0
00224ba0 4a 39 00 tst.b (DAT_0027b588).l
27 b5 88
00224ba6 67 02 beq.b LAB_00224baa
00224ba8 44 00 neg.b D0b
LAB_00224baa
00224baa 4e 75 rts
The function is very straight forward. It tests if the variable at address 0x0027b588 is zero. If so it jumps to address 0x00224baa where the function just returns (instruction rts) to the caller and therefore does nothing else. But if the variable is not zero, it won't jump and instead proceed. Then it negates the byte portion of data register D0 (we stored the damage value there before). So based on some variable located at 0x0027b588, the damage value is negated or not.
We finally found our "damage negation" function! Yay!
Moreover the variable at address
0x0027b588 must be the "cursed flag" and is set somewhere earlier. This is done at the start of a long function which I believe is the text output function for the whole item window. The first piece of code I showed above is from that function but here is the part of it, which actually sets the "cursed flag" variable. Maybe you can find the spot where the variable is set yourself. But I'll just show you:
00224680 43 f9 00 lea (DAT_0027b97a).l,A1
27 b9 7a
00224686 45 f9 00 lea (DAT_002751e4).l,A2
27 51 e4
0022468c 30 29 00 04 move.w (0x4,A1),D0w
00224690 53 40 subq.w #0x1,D0w
00224692 c0 fc 00 3c mulu.w #0x3c,D0
00224696 d5 c0 adda.l D0,A2
00224698 08 2a 00 btst.b 0x0,(0x20,A2)
00 00 20
0022469e 56 f9 00 sne (DAT_0027b588).l
27 b5 88
The first two instructions (lea) load some data structure addresses into address registers A1 and A2.
To know what it is, I had to think a bit. What would be needed to retrieve the cursed flag? First of course the item data as it specifies if the item is cursed.
You will also know that in Ambermoon there are item slots (inventory slots, chest slots, etc). So beside the item data (name, values, flags, price, etc) the game also stores values for the containing slot (which item, how many of the item, etc). When we open an item window in the game, we always perform this type of action on an item slot. The item slot holds the information about which item is placed in it.
This is why A1 will point to the item slot we're looking at and A2 will point to the first item's data. Instructions 3 to 6 (move, subq, mulu and adda) just move the A2 pointer from the first item's data to the item data we're looking at. All items are stored in a sequence in memory. The lea instruction just reads in the address of the first item's data and then the address is modified by further commands to point to the correct item in the sequence.
Item slots
As mentioned, equipment, inventory, chests and merchants store items as item slots.
They all use the same format:
Offset | Type | Description
-------|-------|------------
0x00 | ubyte | Amount of items
0x01 ubyte Number of remaining charges
0x02 | ubyte | Recharge times
0x03 | ubyte | Item slot flags
0x04 | uword | Item index
So I hope you can see how A2 is set up. Instruction 3 moves the value at address A1+0x04 to D0w (word portion of data register 0). Remember A1 points to the item slot data (to the start of it in memory). And at offset 0x04 of it you find the item index. So after that instruction the item index of the slot is stored in D0. D0w is used as item indices are stored as words (16-bit values).
The item index is 1-based inside the item slot structure so item index 1 is the first item there is. This makes sense as there might be empty item slots in which case the item index would be 0. To find the memory address however, we need 0-based indices. Therefore instruction 4 subtracts 1 from D0 (subq instruction).
Every item has a size of 60 bytes which is 0x3c in hexadecimal representation. So we multiply our 0-based item index by 60 to get the right offset (mulu instruction). This is now stored in D0 again. Finally we add this offset to A2 to point to the correct data (adda instruction).
You can think of it like this: skip all the items before in memory. The amount of skipped bytes is ItemIndex*60. If I want the first item, the item index is 0 and therefore 0*60 bytes are skipped. So A2 would still point to the begin of the whole item data section which is also the start of the first item data. If we want the 3rd item we would have item index 2, so we skip 2*60 bytes (the two items before) and so on.
At the end A2 will point to the item data for the item that is shown in the item window. :)
So now we have our item data. It's structure is documented here in full detail: https://github.com/Pyrdacor/Ambermoon/blob/master/FileSpecs/Items.md.
Important to know is that at offset 0x20 of it, there are the item flags. And they look like this:
Item flags
Bit Hex Description
-----|-------|--------------
0 | 0x01 | Cursed
1 | 0x02 | Not important
2 | 0x04 | Stackable
3 0x08 Can be (un)equipped during battle
4 | 0x10 | Destroy after usage
5 | 0x20 | Indestructable
6 | 0x40 | Clonable
7 | 0x80 | Unused in Ambermoon
Ok but now to the interesting part. The last two instructions actually set the "cursed flag" we use in the damage and defense negation function. Let's have a closer look at those instructions.
00224698 08 2a 00 btst.b 0x0,(0x20,A2)
00 00 20
0022469e 56 f9 00 sne (DAT_0027b588).l
27 b5 88
The first instruction is a so called bit test. It tests if a specific bit of some value is set. In our case it tests bit 0 of the value at offset A2+0x20. We already now that this is where the item flags are currently located. From the table above we know that bit 0 is actually the cursed bit. So the instruction tests if the cursed bit is set. The btst instruction will change the zero flag (Z) of the CPU dependent on the cursed bit. The zero flag is mostly set if a value or bit is 0. So if the cursed bit is not set (= 0), the zero flag is set. And if the cursed bit is set, the zero flag is reset to 0. You see it is an inverse logic here.
The second instruction
sne (SET if NOT EQUAL) will set the target value to all ones, if the zero flag is not set and to all zeros, if the zero flag is set. Basically we again invert the logic here. And two times inverting will provide the right logic. The term "not equal" is equivalent to "not zero" in 68k. Equality is often expressed by the zero flag.
The two instructions together will basically implement the following logic:
- If bit 0 of the item flags is set, fill the target value with 1s.
- If bit 0 of the item flags is not set, fill the target value with 0s.
The target value in this case is located at address 0x0027b588.
Remember the negation function FUN_00224ba0 which uses the value at address 0x0027b588 to determine if the item is cursed. It uses a slightly different instruction called just tst which does not test a specific bit but the whole value instead. It just checks if the given value is 0 or not. So if it was filled with 1s it isn't zero obviously but if it was filled with zeros, it is.
Conclusion: The variable at 0x0027b588 is 0 if the item is not cursed and it is not 0 if it is cursed. I guess a programer (including Jurie Horneman) would have called such a variable something like "IsItemCursed".
Ok so far we saw the code which determines if an item is cursed and based on that will negate the values.
But now we want to add the identified flag to the picture.
First things first. The cursed flag is part of the item data but the identified flag is not. Instead it is a flag of the item slot. This makes sense as you can have the same item in different inventory slots and only one of them might be identified yet. So item slots have their own flags. Basically those which can differ for the same item in different slots.
Item slot flags
Bit Hex Description
-----|-------|--------------
0 | 0x01 | Identified
1 | 0x02 | Broken
2 | 0x04 | Cursed
Don't get confused with the cursed flag here. This doesn't say that an item is a cursed item. Instead this is set for equipment slots (and only for them!) if you have equipped a cursed item there. This is used to check if you can unequip an item. If it has this slot flag set, you can't. But as I said, this flag isn't used to check if an item is a cursed item for the item window or stat crippling. So we can totally ignore it for our purpose.
Small recap
There is a function which negates the damage value based on some value in memory, which itself is filled when the cursed flag is set. The defense is negated exactly the same way.
We don't need to change the negation function at all, we can just change the behaviour how the value is filled, which controls the negation. That value is stored at
0x0027b588 (called
DAT_0027b588 above). We want to include the identified flag of the item slot for the value negation. That is our
first task.
Fixing the wrong display for negative values is our second task. To do so we need a little more information.
After the negation function is called, there are two more relevant code lines:
0022487e 7e 03 moveq #0x3,D7
00224880 4e b9 00 jsr FUN_002463b2.l
Just before these lines the damage value was extracted and possibly negated so it was prepared for inserting into the placeholder string.
The first line now moves the number 3 into data register 7 and the second line calls function FUN_002463b2.
Maybe you can guess what that function might do but I will spoiler it here anyway.
As we have our processed damage or defense value (negated or not) and the value 3, this function most likely inserts our value into the placeholder string. The 3 is the max length (= number of digits to insert).
We have to fix the damage and defense display as it currently allows no negative numbers, so this function might be responsible for that. So we will have a closer look at this function later.
The implementation
To add our fix we have to add some code. Unfortunately as we look at binary data and the danger of messing up offsets is big, I decided to add new code to a fresh new code hunk.
If you don't know what hunks are, here is a brief description. Amiga executables are organized as hunks. Basically they are data sections of a specific type. There are code hunks, data hunks, relocation hunks and some others. Code hunks contain executable instructions and data hunks contain just plain data which can be used by the code hunks. For Ambermoon the data hunks contain some graphics (cursor, font, etc), a few builtin palettes, many fixed strings like ingame messages and last but not least the data of all items. A more technical documentation of hunks can be found at https://github.com/Pyrdacor/Ambermoon/blob/master/Files/Hunks.md
and there are more resources out there as well.
In Ambermoon there is only one code hunk in AM2_CPU and two of them in AM2_BLIT. As well as two data hunks in both. AM2_CPU and AM2_BLIT are almost the same file but afaik AM2_BLIT uses a blitter routine for rendering and will have better performance I guess, but won't work on any system (e.g A500). So when you run Ambermoon you will only execute one of them and not both at the same time. So fixes have to be done to both files! The information what exactly is the difference might be wrong. But it's how I have it in mind. The main thing here is that both files have several hunks and we will add another one to the end to add our code. :)
So we have to do a few things now:
- Add a new hunk to the end of the file
- Add the new code to it
- Execute the added code somehow
Ok let's do this. I already assembled the bytes for the new code beforehand and found that 24 additional code bytes are needed. So the new code hunk must have a size of 24 bytes.
The AM2_* files (or Amiga executables in general) start with the header
00 00 03 F3. Then a zero longword (32 bit value = 4 bytes) follows. It has some meaning but we don't need it and you can just ignore it. After that there is the total amount of hunks in the file. AM2_CPU should have 6 and AM2_BLIT should have 7 by now. Then the first and last hunk index follows. In general the first hunk has index 0 and the last has index
HunkCount - 1. So AM2_CPU has
00 00 00 00 00 00 00 05 and AM2_BLIT has
00 00 00 00 00 00 00 06 here. Now for each hunk the size is given as a long-word.
Ok to add a new hunk we have to do 3 things now to the header:
- Increase the amount of hunks. This is easy, just change the 3rd long-word from 6 to 7 for AM2_CPU (or 7 to 8 for AM2_BLIT). It is stored as 00 00 00 06 so just change it to 00 00 00 07.
- Increase the index of the last hunk. This is the 5th long-word. Change it from 5 to 6 for AM2_CPU (or 6 to 7 for AM2_BLIT). It is stored as 00 00 00 05 so just change it to 00 00 00 06.
- Add the size for the new hunk. For AM2_CPU you had 6 hunks before. So 5 header long-words plus 6 hunk size long-words, you would have to add a new long-word at file offset 44 (hex: 0x2C). Please note that hunk sizes are given as "number of long-words" and NOT "number of bytes"! As we need 24 bytes, this means we need 6 long-words. Therefore the size value is 00 00 00 06.
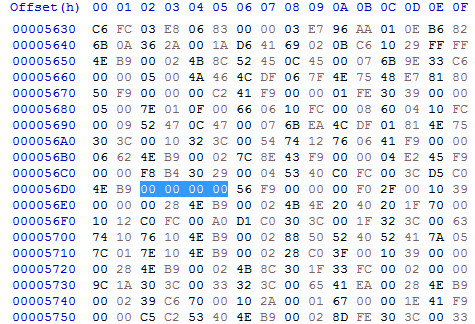
If you have not yet, open your hex editor. Our header could look something like this for AM2_CPU:
00 00 03 F3 00 00 00 00 00 00 00 07 00 00 00 00
00 00 00 06 00 00 B2 D8 40 00 52 BE 00 00 05 5D
40 00 0F 59 00 00 56 DA 00 00 39 F8 00 00 00 06
Now we have to add the actual hunk to the file. As we append it to the end, we just have to add bytes to the very end of the file. Currently the file should end with 00 00 03 F2. Each hunk starts with a header which specifies the type of the hunk. The header 00 00 03 F2 identifies a so called END hunk. This can be used to state that a previous hunk ends here. So for example after each code or data hunk, there might be an END hunk. Those hunks have no header, size or data. They are also not considered in the file header. There is another type of hunk, the Reloc32 hunk which is not considered in the file header but this one has data. But this doesn't matter here for now.
We want to add a small code hunk. To do so we insert the header for it:
00 00 03 E9. After the header we have to specify the size of the hunk's data in long-words again. So as before we add
00 00 00 06 again. Now the actual code follows as binary data. The code bytes are:
48 E7 80 00 10 2A 00 20 02 00 00 01 C0 29 00 03 4A 00 4C DF 00 01 4E 75
I will explain them in detail in a second. At the end we add another END hunk (header) as well.
So in total we add the following bytes:
00 00 03 E9 00 00 00 06 48 E7 80 00 10 2A 00 20
02 00 00 01 C0 29 00 03 4A 00 4C DF 00 01 4E 75
00 00 03 F2
The 24 code bytes from above look like this in Ghidra:
FUN_00289c78
00289c78 48 e7 80 00 movem.l { D0},-(SP)
00289c7c 10 2a 00 20 move.b (0x20,A2),D0b
00289c80 02 00 00 01 andi.b #0x1,D0b
00289c84 c0 29 00 03 and.b (0x3,A1),D0b
00289c88 4a 00 tst.b D0b
00289c8a 4c df 00 01 movem.l (SP=>local_4)+,{ D0}
00289c8e 4e 75 rts
To come up with this code I had some thinking and used the following PDF to translate my ideas to actual code: http://goldencrystal.free.fr/M68kOpcodes-v2.3.pdf
To understand what I am aiming for, we have to remember the current code.
00224698 08 2a 00 btst.b 0x0,(0x20,A2)
00 00 20
0022469e 56 f9 00 sne (DAT_0027b588).l
27 b5 88
At the moment only the cursed flag is checked by the btst instruction. To keep the amount of code bytes in the original code hunk the same, I'll replace this instruction by a jsr instruction which will jump to our new sub-routine in the new code hunk. The new code will provide the adjusted logic to set the zero flag in a way that the sne instruction will work as expected. A jsr instruction (JUMP TO SUBROUTINE) has the ability to jump to the full memory range and also needs 6 bytes exactly as the btst instruction. So we won't be forced to add additional bytes to the first code hunk. After the sub-routine is finished and calls a rts instruction (RETURN FROM SUBROUTINE), it will continue where it was called. So after our sub-routine finishes, the sne instruction is executed.
The new code in the first code hunk will look like this:
00224698 4e b9 00 jsr FUN_00289c78.l
28 9c 78
0022469e 56 f9 00 sne (DAT_0027b588).l
27 b5 88
So we have to replace the 6 bytes 08 2A 00 00 00 20 with a jsr instruction to our new code. Our new code is at offset 0 of the new hunk. Amiga executabes have a neat feature called address relocation. Because of that we can just specify the relative offset to the start of the hunk (0 in our case).
So let's move on to the fun part. Open up our opcode PDF I linked above or use the picture. The jsr instruction is the 5th item in the second part of the table. It always starts with the bit sequence 0 1 0 0 1 1 1 0 1 0. We want an absolute long parameter to specify the 32 bit jump address, so for the M and Xn parts we use 1 1 1 and 0 0 1 (see the small tables on the right with the same colouring). Note that an absolute short (16 bit) would not be enough as it can only jump to address 0x7fff at max!
Let's build our opcode by concatenating all those bits: 0 1 0 0 1 1 1 0 1 0 1 1 1 0 0 1. Luckily I can convert binary values to hex values in my head easily:
4E B9. But you can double check with a converter if you want to. So this is the basic opcode for the jump instruction. But we stated that we want to use an absolute long parameter for the jump address, so let's add it. The program should jump to begin (address 0x00000000) in our new hunk so we just add
00 00 00 00. And finally we have our full instruction:
4E B9 00 00 00 00. Easy, isn't it?
We only have to replace
08 2A 00 00 00 20 by the new sequence
4E B9 00 00 00 00 to add the jump instruction. You can search for the sequence in your hex editor hopefully and replace it there. These bytes should only be present once in the file.
What do you say? Why 0x00000000? At least it is an
absolute address, isn't it?
Yeah, you got me there. I didn't tell you the whole story. Unfortunately now it'll get a bit complicated.
Whenever there is an absolute address referenced in code, normally the compiler would automatically add an entry in a so called relocation table. As we modify code by hand we have to do this on our own.
But what is that relocation table and how do we modify it? Good question!
Relocation tables
When an Amiga program is executed, the hunks are moved to memory. But it is not guaranteed that they are placed next to each other. So for example our first code hunk might be at a totally different place then our new last code hunk. The distance in memory from the call to the sub-routine itself might be different for every program execution. But of course the CPU has to know where the sub-routine is, when it calls it.
To do so the Amiga "marks" all the absolute address references in the code by adding an entry to the relocation table. When the program is started, it eventually knows where each hunk was placed in memory. Then it replaces all the "marked" address references by the real memory addresses.
Every code hunk which has any absolute address reference is followed by a relocation hunk. For long-word references it is a RELOC32 hunk (32 bit addresses), for word references it is a RELOC16 hunk (16 bit addresses). Most of the time you will see the RELOC32 hunk, as 16 bit addresses are not used that often. Not at all in Ambermoon. But in theory you even could have both.
The RELOC32 hunk immediately follows the code hunk without an END hunk in-between. The RELOC32 hunk can have multiple sections. Each section contains offsets for a specific target hunk.
Let's say code hunk 0 has some long-word address references to hunk 1 and some to hunk 6. Then the RELOC32 hunk for code hunk 0 would have two sections. One for hunk 1 and one for hunk 6.
Each section has a list of offsets inside the source hunk (code hunk 0 in the example). This is basically the "marker". It tells the program at which offsets in the source hunk it can find an absolute address reference. With source hunk I mean the hunk which uses the addresses (e.g. by a sub-routine call or by loading data from that address).
Maybe it will become a bit clearer when we try to add our own address reference now. =D
Let's look at our modified jump code again:
4E B9 00 00 00 00
It starts with the 4E B9 which means basically jsr with absolute address. Then the address follows (in our case 00 00 00 00). This address itself (the 4 bytes) is located somewhere in our code hunk. We changed it with the hex editor so we should at least know where to find it inside our modified AM2_CPU file.
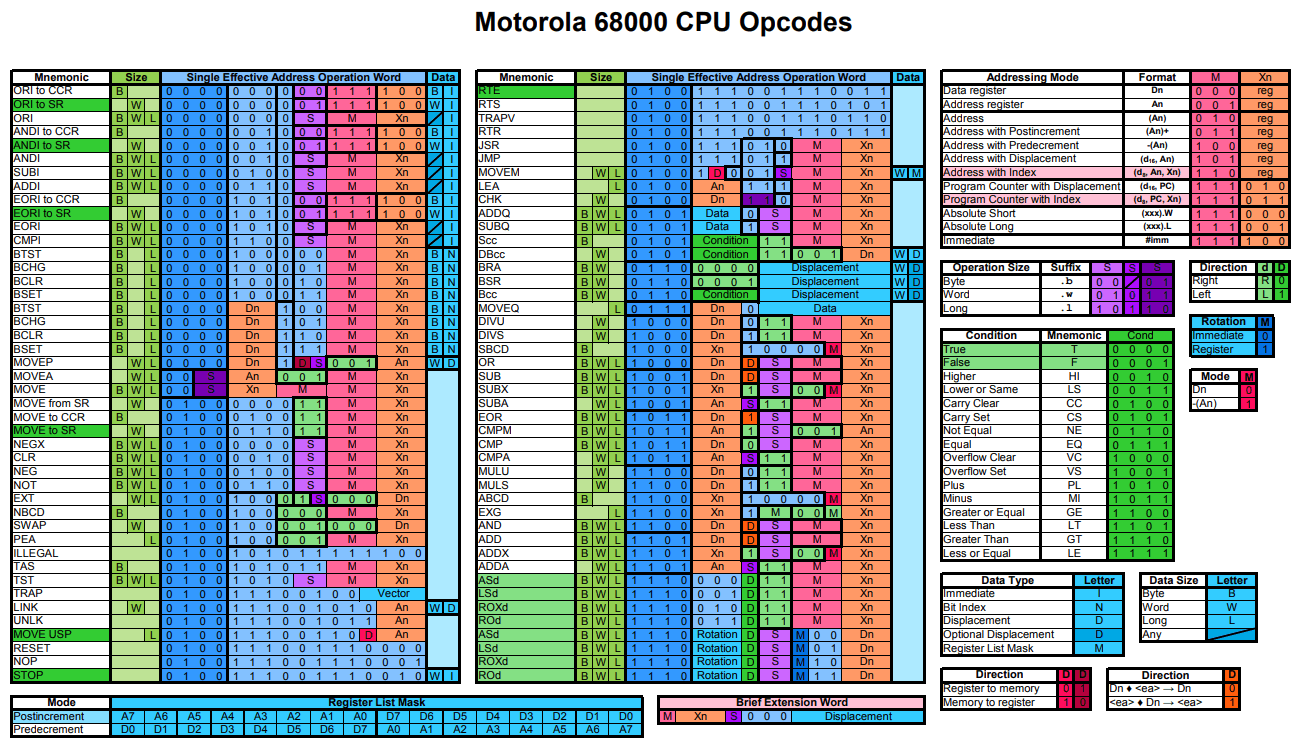
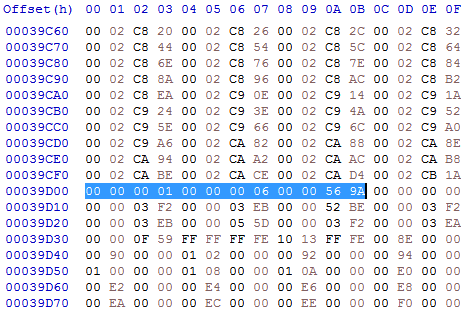
In my case at file offset 0x000056D2:
The code hunk's data starts at 0x00000038 (after header and size):
So the four bytes that specify the absolute address are located at offset 0x0000569A inside the code hunk.
It is an offset relative to the start of the hunk of course: 0x000056D2 - 0x00000038 = 0x0000569A.
We now have to mark this offset as an absolute reference. To do so we have to add it to the relocation table.
As the code of Ambermoon already references many absolute addresses, there is already a RELOC32 hunk. The header for such a hunk is 0x000003EC. So open a hex editor and search for the sequence 00 00 03 EC. You might find two of them but stick to the first one. A RELOC32 hunk will be followed by an END hunk. So search from your current position in the file to the next END hunk with the byte sequence 00 00 03 F2.
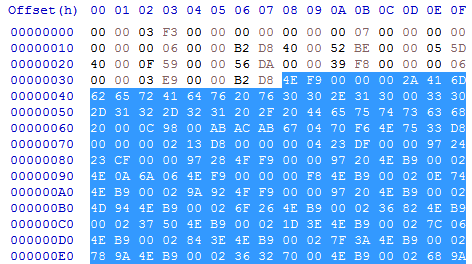
You should end up here:
We are now just behind the end of the RELOC32 hunk. As you can see the RELOC32 hunk ends with four 00 bytes (just before the END header).
As I said before the RELOC32 hunk consists of sections. One for each target hunk. Each section starts with the amount of references (given as a 32 bit long-word), followed by the index of the target hunk (also a long-word). If the amount is 0, the end of the RELOC32 hunk is reached and there is no more data. So the four
00 bytes are the last amount which is 0 and therefore marks the end of the hunk.
Now we want to add another section to the relocation table for our new code hunk. In AM2_CPU this hunk has index 6 (in AM2_BLIT it would be 7). We have exactly one reference in the first code hunk to this hunk: our jump instruction. So we add
00 00 00 01 00 00 00 06 just before the four
00 bytes. This way we tell the program that there is another section with 1 reference which targets hunk 6.
Of course we also have to add the location where this reference is inside the source code hunk. And this is our offset we calculated just a minute ago: 0x0000569A.
So after our change it should look like this:
When the program is now executed, the long-word at relative offset 0x0000569 in code hunk 0 is replaced by start of the target hunk (6) in memory + the given long-word. We specified the jump address for the jump as long-word 00 00 00 00, so after the relocation the jump target address will be start of the target hunk (6) in memory + 0. And as our new code is exactly at the start of hunk 6, we have achieved exactly what we wanted: our new code is called from the original code hunk.
With all these changes, the jump should work. We can check this in Ghidra. It should look like this:
00224698 4e b9 00 jsr FUN_00289c78.l
28 9c 78
0022469e 56 f9 00 sne (DAT_0027b588).l
27 b5 88
At address 00289c78 you should see our new code in Ghidra. You should even be able to click on FUN_00289c78 and Ghidra should directly jump to the new code. If you only see bytes with ?? at the target location, just rightclick and choose "Disassemble" there to see the code.
New code explanation
Ok so now we finally call our sub-routine from the new code hunk instead of just performing a simple bit test for the curse flag. But how does the new code actually work?
First we have to remember that A1 points to the item slot and A2 points to the item data. We also know that the item slot flags (with the identified flag) are located at A1+0x03 and the item flags (with the cursed flag) are located at A2+0x20. If not, don't worry. It is documented in the links above. We now want something like this (pseudo code):
if (itemSlotFlags has IDENTIFIED_FLAG and itemFlags has CURSED_FLAG)
zeroFlag = 0; // = result is not zero -> show cursed values
else
zeroFlag = 1; // = result is zero -> don't show cursed values
This might seem a bit tricky as the logic is inverted here (remember that sne also has inverted logic which is still used afterwards). We work with the zero flag but actually "not zero flag" means "show cursed values".
Ok let's do this. First I came up with the instructions. I am not a 68k pro so I don't know if it is a good solution but it should do.
The code bytes we added were:
48 E7 80 00 10 2A 00 20 02 00 00 01 C0 29 00 03 4A 00 4C DF 00 01 4E 75
Expressed as assembler instructions it is:
FUN_00289c78
00289c78 48 e7 80 00 movem.l { D0},-(SP)
00289c7c 10 2a 00 20 move.b (0x20,A2),D0b
00289c80 02 00 00 01 andi.b #0x1,D0b
00289c84 c0 29 00 03 and.b (0x3,A1),D0b
00289c88 4a 00 tst.b D0b
00289c8a 4c df 00 01 movem.l (SP=>local_4)+,{ D0}
00289c8e 4e 75 rts
The two movem.l instructions basically save the old value of data register 0. As we modify D0 in our code and we don't know who else might call us, we add this safety net. It ensures that D0 will be the same as before after our sub-routine finishes. It saves the value in D0 to the stack and moves it back from the stack to D0 after we're done. So it hasn't much to do with the logic. This is just my first attempt on clean code in 68k. :D
Now to the interesting part.
First we move the byte at A2+0x20 to D0. At offset 0x20 inside the item data (A2) there are the item flags. So we store those flags in D0.
Then we mask the flags as we only are interested in the curse flag (bit 0). We use the AND instruction with the value 0x1. An AND instruction is a bit-wise instruction. It combines the bits of two values. The bit in the resulting value is 1 if both input bits are also 1 and 0 otherwise. We AND with the value 1 which is
00000001 in binary. So if we AND this value with the flags it should be obvious that every bit except for the right one will always become 0 in the output as to become 1 it is necessary that both bits are 1 and they are at least 0 in the seven left-most bits of the decimal value 1.
Example
We assume that the flags contain the value 0x19 which is binary
00011001. Let's AND that with 1:
00011001 (0x19)
& 00000001 (0x01)
----------
00000001
You see that even though there are some more 1-bits in 0x19, they all become 0 as the AND needs both bits to be 1. This way we mask out all bits but the right one.
Another example with the value 0x18 which is binary
00011000:
00011000 (0x18)
& 00000001 (0x01)
----------
00000000
In this case the right bit is also 0, as the source bit is 0. So when "ANDing" the number 1, we effectively check if the lowest bit is 0 or 1 and transfer only that to the output. The other bits are just discarded. The lowest bit is of course the curse flag in this case.
Now the next instruction follows which is
and.b (0x3,A1),D0b. Again we use the AND operation. This time we make use of a lucky coincidence. At offset 0x3 inside the item slot data (A1) we have the item slot flags which contain the "identified flag". Luckily it is also stored in bit 0 there. This means it is at the same position as the cursed flag inside the item flags. Therefore we can just mask with it again. The previous AND instruction leaves the value in D0 as either 1 (00000001) or 0 (00000000) as the upper 7 bits are discarded. If the cursed flag was not set, D0 will now be 0. "ANDing" with 0 will always leaves the resulting value at 0 regardless of the other value. So if the cursed flag wasn't set, the output in D0 is always 0. If the cursed flag was set, the value in D0 is 1 before the second AND. And now it depends. If the identified flag is not set, the AND results is a 0. On the other hand if it is set and the cursed flag is set, the result is 1.
Logic table:
Cursed | Identified | Cursed AND 0x01 | Identified AND previous value
--------|------------|-----------------|------------------------------
0 | 0 | 0 | 0
0 | 1 | 0 | 0
1 | 0 | 1 | 0
1 | 1 | 1 | 1
The last column gives the result in D0. So you see it is only 1 if the item is cursed and identified. That's exactly what we wanted.
Then in the next line the tst instruction just changes the zero flag based on the value of D0 and finally we return back from the subroutine with rts.
I created the binary opcodes with the help of the PDF from above again.
Congratulation! By now the code should already work. Damage and defense values would not be negated if the item is not identified. We will test this together with the other fix soon.
Final adjustments
One last change needs to be done. For now the negation of the displayed value will only take place when the item is cursed and identified. But we also need to fix the display issue with negative values.
This turned out to be pretty easy. Remember the two lines which seemed to insert the damage and defense values into the placeholder string?
0022487e 7e 03 moveq #0x3,D7
00224880 4e b9 00 jsr FUN_002463b2.l
There the number 3 (which gives the length of the string) is moved into D7. Then the function at 0x002463b2 is called. I'll show the first part of that function here:
002463b2 2f 00 move.l D0,-(SP)=>local_4
002463b4 4a 47 tst.w D7w
002463b6 67 00 00 32 beq.w LAB_002463ea
002463ba 0c 47 00 0b cmpi.w #0xb,D7w
002463be 62 00 00 2a bhi.w LAB_002463ea
002463c2 be 7c 00 03 cmp.w #0x3,D7w
002463c6 6a 06 bpl.b LAB_002463ce
002463c8 48 80 ext.w D0w
002463ca 48 c0 ext.l D0
002463cc 60 08 bra.b LAB_002463d6
002463ce be 7c 00 06 cmp.w #0x6,D7w
002463d2 6a 02 bpl.b LAB_002463d6
002463d4 48 c0 ext.l D0
D7 (the max string length) is checked here several times. The crucial lines are:
002463c2 be 7c 00 03 cmp.w #0x3,D7w
002463c6 6a 06 bpl.b LAB_002463ce
This checks if D7 is greater or equal than 3. If so it jumps to LAB_002463ce. In our case, D7 is set to 3 so the jump is performed. At the jump target, D7 is checked for greater than or equal to 6 which is not the case so we proceed to the last line in the listing: ext.l D0. The instruction ext extends a byte to a word or a word to a long-word while preserving the sign. Basically if you have the byte 05 it will extend to the word 00 05. Very easy, the value stays the same: +5. But for negative values it isn't that obvious. Let's take our -1 value. We already know that it is 0xFF (all 1-bits) if stored as a single byte. But if I would just prepend a zero like 00 FF this would be basically the value 255 and not -1. The 'sign' bit is always the most significant bit (the left-most bit). This is also true for words and long-words! So the value -1 stored in a word is actually FF FF (again all 1s) and as a long-word it is FF FF FF FF. So the ext instruction takes care of the sign preserving. Basically it extends the most significant bit into the prepended upper bytes. If the most significant bit of the input is 0, it prepends zero bytes, if it is 1, it prepends bytes full of 1-bits (bytes with hex value 0xFF).
But what does this mean for our damage value? Let's take our -10 which is binary
11110110. If we would extend this to a word (with
ext.w) everything would be fine. It would stay as -10 (11111111 11110110) as the 1-bit is extended to the upper byte. But we actually extend directly to a long-word here with
ext.l. And this instruction takes a word as input.
This means that the lower word of D0 is used as the input. But we filled only the lower byte. So before the extension, our D0 register contains 00000000 00000000 00000000 11110110. It now extends the most significant bit of the lower word which is 0! This means that the instruction extends zero bits to the upper bytes, leaving the value in D0 as it is and interpreting it as a positive word instead of a negative byte. This is why we see a positive number in-game!
The whole function is designed for a 2-digit output of bytes. Skill values for example are all limited to the range 0 to 99 and display "**" if it exceeds that range. The 3-digit output only works for positive values though as we saw just now. There the extension would work just fine.
But if you look closely there is actually a
ext.w instruction in there. But it is only used if the check for greater or equal 3 is not true. Therefore it will be used for 1 or 2 digit insertion. Luckily we can safely say that there will be no item in-game which has more damage or defense than +99. Otherwise the game would be pretty broken anyway. So 2 digits should be enough. Let's check what happens if D7 would be 2. The program would not jump and therefore execute these two lines instead:
002463c8 48 80 ext.w D0w
002463ca 48 c0 ext.l D0
We see our good ol' friend ext.l there and it does exactly the same as above. But before that, the ext.w is executed. This time it will take a byte and extend it to a word. As we have 11110110 in the lowest byte of D0 and the sign bit (most significant bit) is 1, the word is extended with 1s and becomes 11111111 11110110. Now the ext.l will take this word as input and the sign bit is now 1. So it will also extend the long-word with 1s and the result will be 11111111 11111111 11111111 11110110. And this is -10 expressed as a two-complement long-word.
The rest of the function will then add either a plus (positive values), minus (negative values) or space (for the 0). So the function can already display negative values if they are provided correctly. The bug actually was the extension of 3-digit single byte values. With 2 digits it just works without change.
Of course we are now limiting the damage and defense values to the range -99 to +99 but this should be fine.
It might be difficult to track down this issue but in the end it is a very easy fix. The only thing we have to use the length of 2 instead of 3. Or in short: just move a 2 into D7 instead of a 3:
0022487e 7e 02 moveq #0x2,D7
00224880 4e b9 00 jsr FUN_002463b2.l
Don't forget to do this for damage and for defense! The above code is used twice.
Ok, the function should now process the value correctly. You could use the executable and cursed items would work like we intended.
There is one last thing we should adjust though. But it is more of cosmetic nature. Still I would like to take the opportunity to show how the numbers are actually inserted into the string.
Remember that we moved a placeholder string "012" into address register 0 at some point? Look at the
lea instructions below:
0022486e 41 f9 00 lea (s__012_00272180+9).l,A0 = " 012"
27 21 89
00224874 10 2a 00 0e move.b (0xe,A2),D0b
00224878 4e b9 00 jsr FUN_00224ba0.l
22 4b a0
0022487e 7e 03 moveq #0x3,D7
00224880 4e b9 00 jsr FUN_002463b2.l
24 63 b2
00224886 30 3c 00 20 move.w #0x20,D0w
0022488a 32 3c 00 92 move.w #0x92,D1w
0022488e 41 f9 00 lea (s_SCHADEN:_012_00272180).l,A0 = "SCHADEN: 012"
27 21 80
Both lea instructions move some memory address to A0. The first one uses address 00 27 21 89 and the second one uses 00 27 21 80. You should notice that both addresses are only 9 bytes away from each other. In fact the first used address points into the middle of the string "SCHADEN: 012" (in english "DAMAGE: 012"). It points to the " 012" part of it. I said before that this is a placeholder for a 3-digit number. Now we have only 2 digits left, so it's tempting to just replace that by " 01". But first let's have a look on how the placeholder is actually used.
To be honest the program totally ignores the "012". You could also use "foo" or even spaces instead and it would still work. The placeholder is only an indicator for the programer to show where the string should be inserted and which length it should have. It is not used in any case by the program! What really matters here is the address which is moved to A0. Because the function which inserts the number, starts inserting it exactly at that address. Note that it actually starts one character before the "012" (notice the space in front of itin the hint). This is because the sign (plus, minus or space) is added there and only after it the number as 3 digits would be inserted. But regardless of the placeholder string, the number of digits is actually moved into D7 which is all that is needed to specify the number of digits. So the first
lea specifies where the number is inserted into the string and the
moveq specifies the number of digits.
As mentioned earlier we only want to use 2 digits and changing the placeholder string to "01" would have no effect at all. But for consistency reasons I would still prefer to change the placeholder. Another developer might see the intent better this way. To avoid changing the total number of bytes and therefore offsets, just replace the "2" by a space character and don't remove the byte that contains the "2" in memory! A space won't be visible in game so this should be ok.
The result might look like this:
0022486e 41 f9 00 lea (s__012_00272180+9).l,A0 = " 01 "
27 21 89
00224874 10 2a 00 0e move.b (0xe,A2),D0b=>DAT_002751f2
00224878 4e b9 00 jsr FUN_00224ba0.l
22 4b a0
0022487e 7e 03 moveq #0x2,D7
00224880 4e b9 00 jsr FUN_002463b2.l
24 63 b2
00224886 30 3c 00 20 move.w #0x20,D0w
0022488a 32 3c 00 92 move.w #0x92,D1w
0022488e 41 f9 00 lea (s_SCHADEN:_012_00272180).l,A0 = "SCHADEN: 01 "
27 21 80
Remember to do this for "SHIELD:" (in german "SCHUTZ:") as well.
Testing
After all the hard work we want to test this of course. Unfortunately in the original Ambermoon there is no cursed item where we could see this, so why we don't curse another one. >D
Cursing an item is pretty easy. I will pick a normal dagger here as my victim so you can obtain it rather quickly after starting a new game. Just walk to the kitchen, open the cupboard and then take it to the sage in Spannenberg to identify it.
I mentioned somewhere above that the executables contain the data of all items and that data also contains the item name. So again, open your hex editor and search for "DAGGER" or "DOLCH". Note that some hex editors distinguish between string search a hex sequence search! At that point we need a text search.
You might find multiple locations but pick the one which only says "DAGGER" or "DOLCH" and not "SLING DAGGER" or "SCHLEUDERDOLCH" etc.
We will need our item data documentation again. There we can see that the item name starts at offset 0x0028 in relation to the start of the data. The item flags (with the cursed flag) is located at offset 0x0020 as we already know. So the difference are 8 bytes. From the location of your found item name, go 8 bytes up to reach the item flag byte.

The item flags are 0x4A which is 01001010 in binary.
Bit 1 is set which is "Not Important" (you can drop it).
Bit 3 is set which is "Can be (un)equipped during battle".
Bit 6 is set which is "Clonable".
To curse the dagger we just have to set Bit 0 now: 01001010 -> 01001011
Expressed as a hexadecimal value this becomes 0x4B. Simply change the value and the dagger will be cursed in Ambermoon!
Note that we only modified one file (e.g. AM2_CPU) but dependent on the used Amiga the other file (e.g. AM2_BLIT) might be used. If the dagger is not cursed, this might be the cause. If you use an emulator, just try to use another hardware spec. For a real Amiga you will have to perform the changes to the other file as well.
Let me know how your tests went. I think it is very fulfilling to do all this analyzing, thinking and editing and then see the results in the actual game. Hopefully all works out for you.
Closing
By outsourcing new code to a separate code hunk and create jumps to it from the original code, even the original Ambermoon code can easily be extended or fixed. Maybe someone can make use of it in the future.
I hope it wasn't too difficult to understand. It is often really hard to estimate the knowledge of the reader. Even more so if you are very deep advanced into the matter and the blog article has these dimensions.
If some things are not clear or you have some suggestions, feel free to give me your feedback. You can visit the projects on github or follow/pm me on Twitter. Of course you can also send me a mail.
https://github.com/Ambermoon.net
https://github.com/Ambermoon-Advanced
Thanks for reading!
Pyrdacor 2022
Share this blog post